I love my Coros Vertix 1 and it’s awesome that Coros added support for mapping in an update, for free.
But while the Open Street Map based map material they provide is nice, it just doesn’t come close to the official SwissTopo
map data for Switzerland.
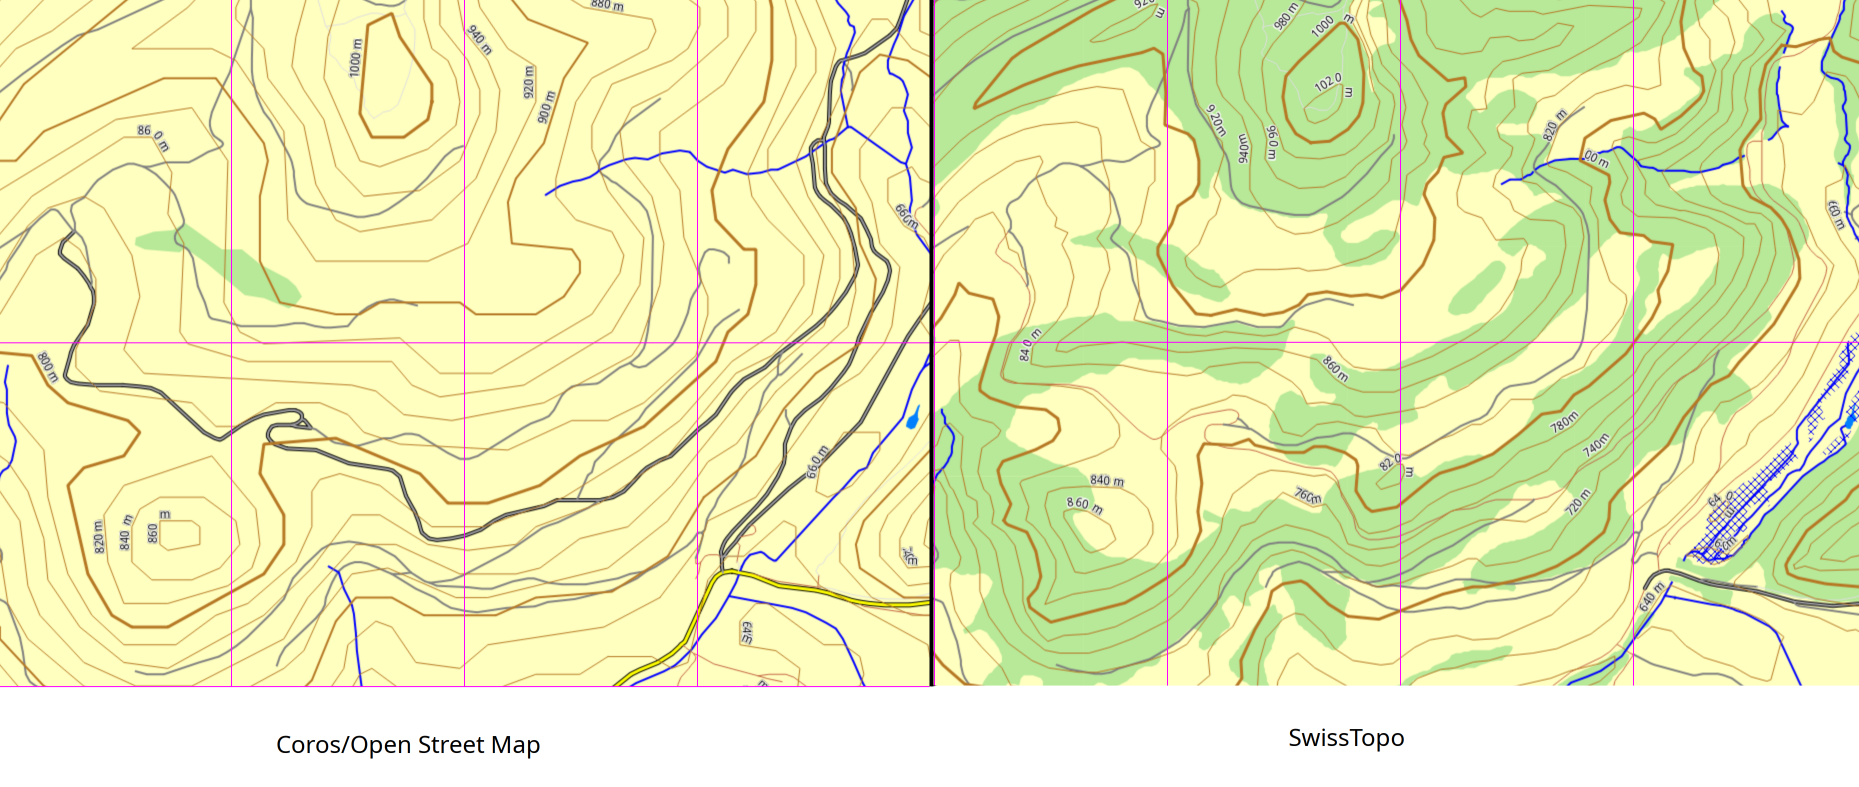
As can be seen, the Coros/OSM material contains very few forests, does not contain all wetland, roads differ a bit in size and
the height contour lines are pretty low resolution (e.g. in the lower left corner), among other things.
When navigating in the wilderness, I want as much detail as possible so I can know where I’m at.
Unfortunately, there’s no other map material available for the Coros watches and scouring the internet I couldn’t find anyone
that got custom maps running on their watch.
So I decided to reverse-engineer the Coros and try and get the SwissTopo maps onto my watch. And write it down to save others the trouble.
If you’re just interested in the map files and not the technical details, you can skip to then end.
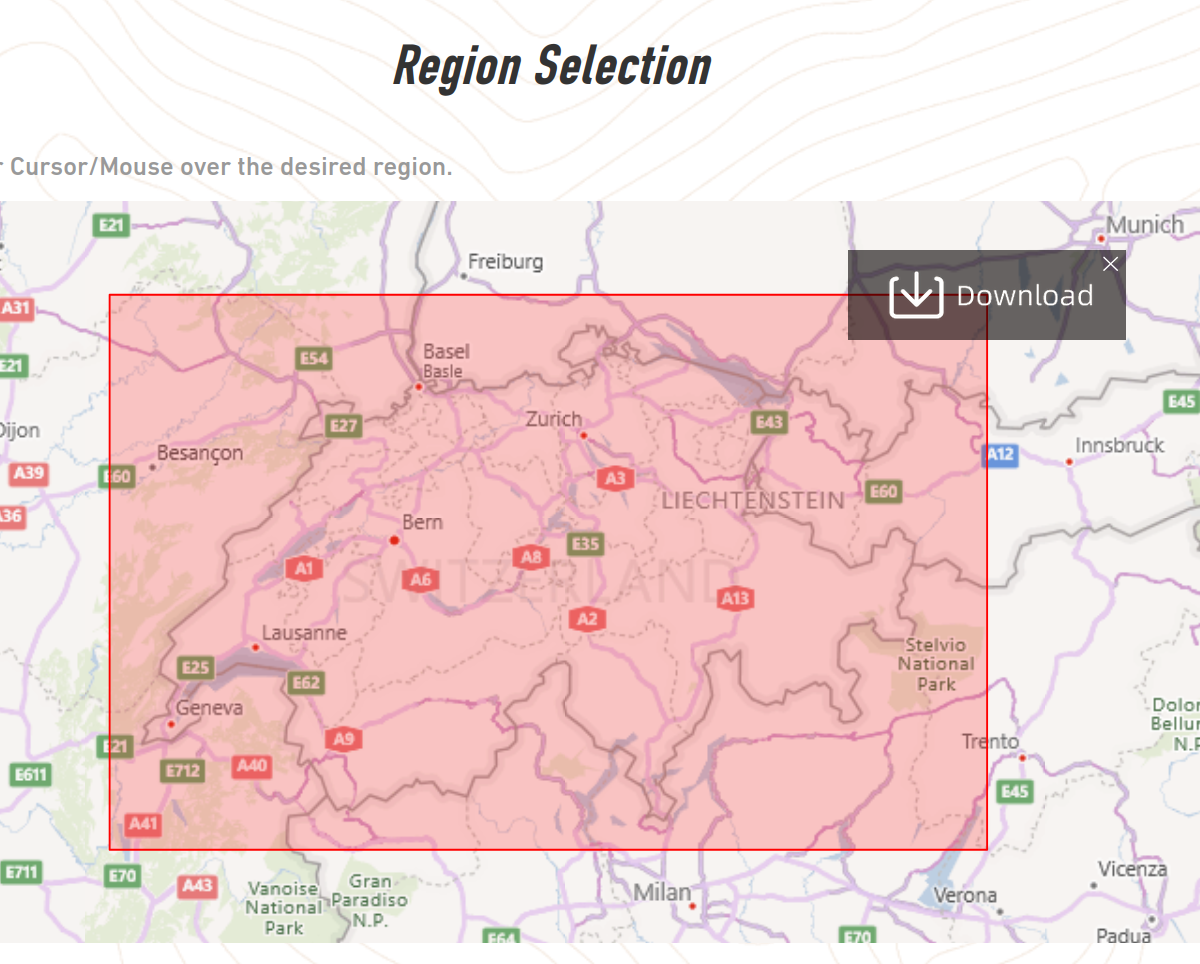
Maps for Coros watches can be easily downloaded by region on the Coros download page. When downloading,
one can select the region to export, making it easy to only select Switzerland for our purposes.
We can download a Landscape Map (Containing roads, forests, rivers etc.) or a Topo map (containing contoure lines).
Looking at the downloaded Zip files, they contain various folders and subfolders.
├── GM
│   ├── G1000000L.csm
│   └── G1000000R.csm
├── Instructions_cn_ZH.pdf
├── Instructions_en_US.pdf
└── OSM
    └── 0
        ├── 35
        │   └── 0
        │       ├── S0350139L.csm
        │       └── S0350139R.csm
        ├── 46
        │   └── 0
        │       ├── S0460007.csm
        │       ├── S0460008.csm
        │       ├── S0460009.csm
        │       └── S0460010.csm
        ├── 47
        │   └── 0
        │       ├── S0470007.csm
        │       ├── S0470008.csm
        │       ├── S0470009.csm
        │       └── S0470010.csm
        ├── 48
        │   └── 0
        │       ├── S0480007.csm
        │       ├── S0480008.csm
        │       ├── S0480009.csm
        │       └── S0480010.csm
        └── 51
            └── 1
                ├── S0511001L.csm
                └── S0511001R.csm
The instruction pdfs are just about installing the maps, but they don’t contain any helpful information on the maps themselves.
The GM folder always has the same contentno matter the region we select, so it isn’t helpful, either.
The OSM folder (For Landscape maps, it’s CM for Topo maps but otherwise identical) is where it gets interesting. There are many
different files that change depending on which region we select. So they are likely the ones containing the actual map material.
Also note folders OSM/0/35/ and OSM/0/51/, which are included in every download no matter what region is selected and don’t change.
More on these later.
For now we can focus on the 46-48 folders. We can see that the filename matches the folder structure a file is in, with Landscape map
files starting with S and Topo map files starting with C as the filename, respectively.
The files contained end in .csm and a quick search tells us that this is used by the 3ds Max 3d animation software, not related to
maps at all, so that can’t be right.
Looking at the content of the files in a hex editor, we see some headers and data that give us a clue as to the format:
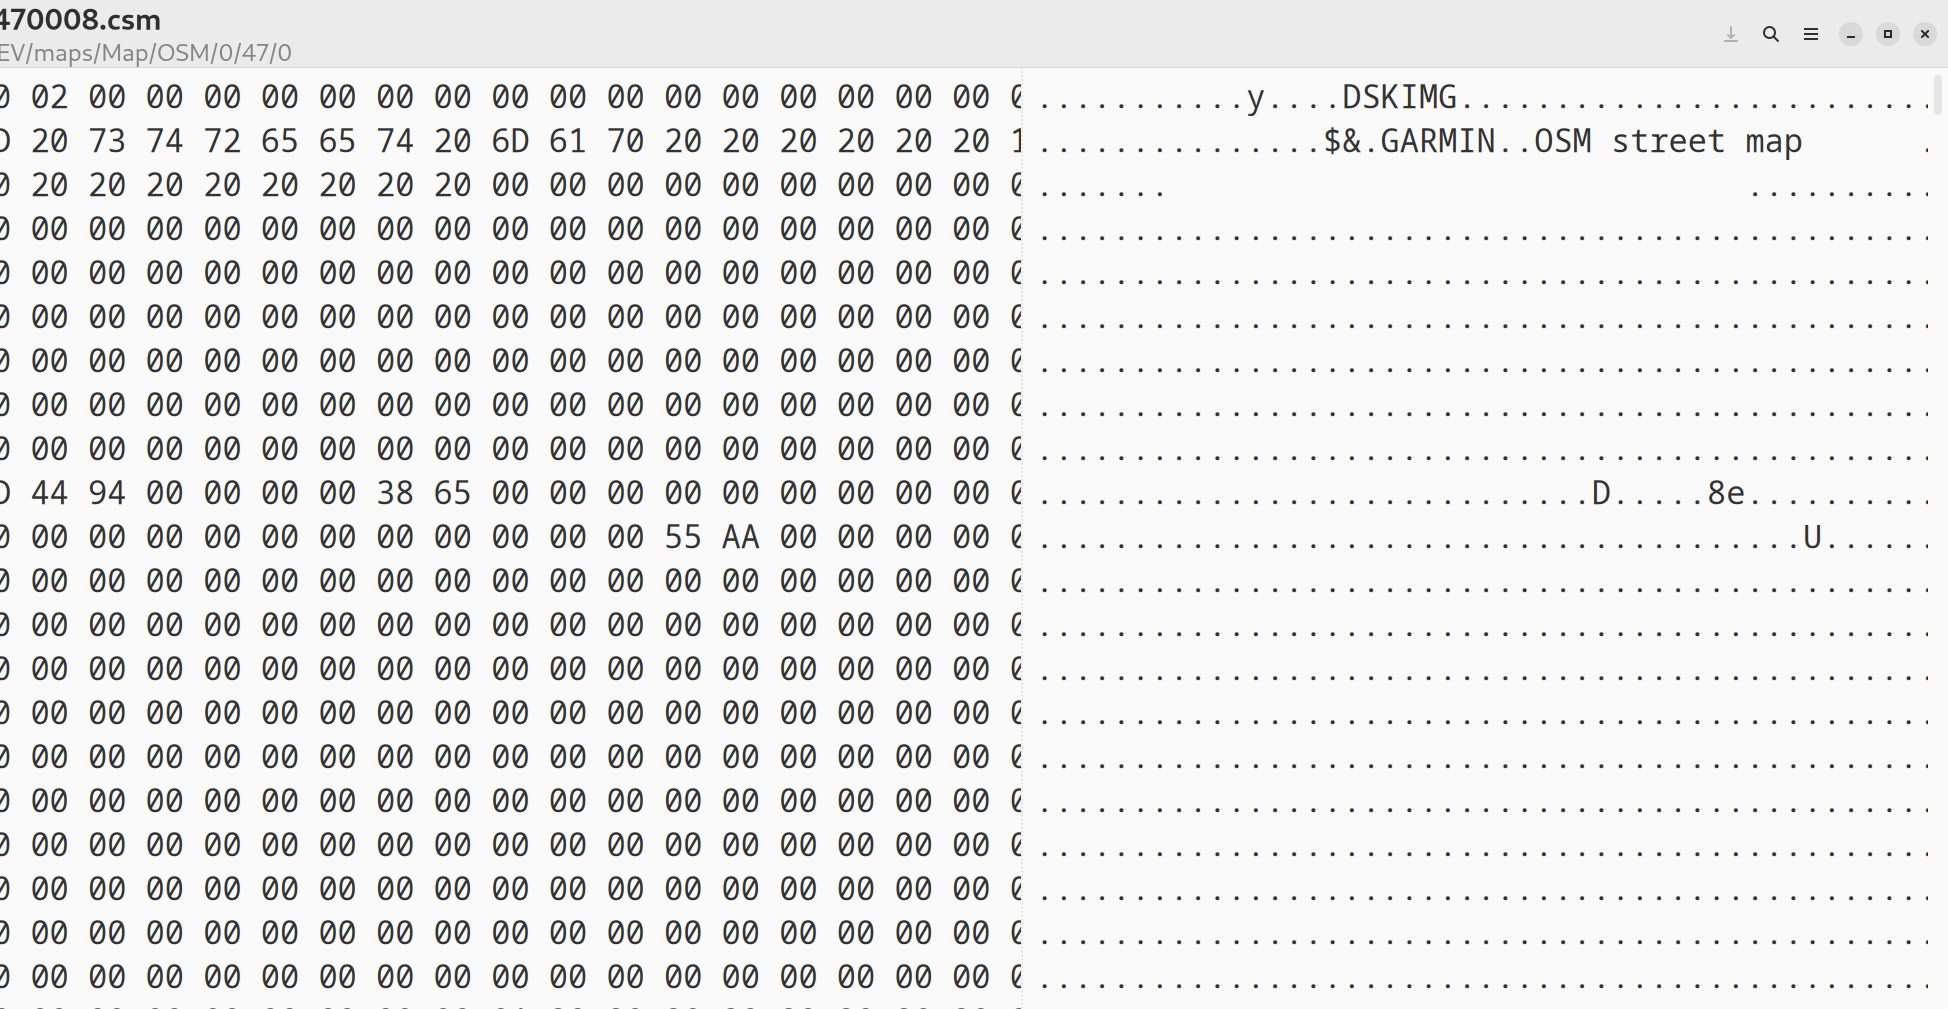
Not too much meaningful information here, but the strings GARMIN and DSKIMG appear in there. Searching for those turns up the normal
Garmin .img map format.
So it looks like the maps are actually in Garmin format and Coros just changed the file extension. Though with Garmin we usually get
a gmapsupp.img file along with some supporting files, not the folder structure we’re seeing above.
Renaming the files to the .img extension and opening them with GMapTool confirms
that they are indeed Garmin maps:
❯ gmaptool -i -v S0470007.img
gmt v0.8.220.853b  CC BY-SA (C) 2011-2015 AP www.gmaptool.eu

Input file: S0470007.img.

File:           S0470007.img, length 10637312
Header:         09.07.2021 21:38:37, DSKIMG, XOR 00, V 0.00, Ms 0
Mapset:         OSM street map
fat:            400h - 600h - 2000h, block 4096
maps:           1, sub-files 3

Sub-file         fat     length
63240001 RGN    600h  10566074
63240001 TRE   1C00h     54019
        map 3c4f741 (63240001)
        date 09.07.2021 21:38:42
        priority 25, parameters 1 3 17 1
        levels [17,18,20,22,24], zoom [84,3,2,1,0]
        N: 47.999997, S: 47.000005, W: 7.000008, E: 8.000000
        Map data (c) OpenStreetMap and its contributors
        http://www.openstreetmap.org/copyright
        This map data is made available under the Open Database License:
        http://opendatacommons.org/licenses/odbl/1.0/
        Any rights in individual contents of the database are licensed under the
        Database Contents License: http://opendatacommons.org/licenses/dbcl/1.0/
        Map created with mkgmap-r4793
        Program released under the GPL
63240001 LBL   1E00h       369
        CP    0, ASCII 7-bit sort

Map              length s-f  CP    prio  PID   FID  name
63240001 MPC  10620462  3        25
As we can see, this file (S0470007.img) covers a map segment N: 47.999997, S: 47.000005, W: 7.000008, E: 8.000000, or rounded
N: 48, S:47, W: 7, E: 8. Could it be that the 47 and 7 in the filename refer to the map segments south and west coordinate,
with each map being a 1° degree by 1° degree area?
Looking at the other files, this is indeed the case. The folders 0 and 1 denote the sign of the coordinates, with 0 meaning +
1 meaning -. Some files end in L or R, which just means left or right. In those cases, each file is only a 1° by 0.5° degree section,
which I think is just there to work around maximum file size limits for Garmin .img files.
This also sheds some light on the two other folders mentioned above, OSM/0/35/ and OSM/0/51/. S0350139L.csm maps to coordinates
N: 35°, W: 139°, an area containing Tokyo, and S0511001L.csm maps to N: 51°, W: -1°, which contains London. For some reason,
Coros decided to include those two map segments in every download, essentially wasting space on the device for no good reason that
I could discover. Deleting those folders does not interfere with the functioning of the device in any way.
Now that we know the format the maps are in, we can try and turn the SwissTopo maps into the same format.
The vector map material for the SwissTopo 10m resolution maps can be freely downloaded from the SwissTopo download page.
I downloaded all the sectors as Geopackage (ZIP) format, because Geopackages can be easily opened with QGis,
a common mapping/GIS tool. All the files together are around 150gb and took around me 3 hours to download.
Since all the sectors are in individual Zip files, we need to extract all of them and combine them into a single Geopackage
using GDal:
❯ unzip "swiss-map-vector10*.zip"

❯ for filename in */SMV10_CHLV95LN02.gpkg; do ogr2ogr -f "gpkg" -append target.gpkg "$filename"; done
Now we have a file target.gpkg that contains all the Swiss map sectors combined, which we can open in QGis.
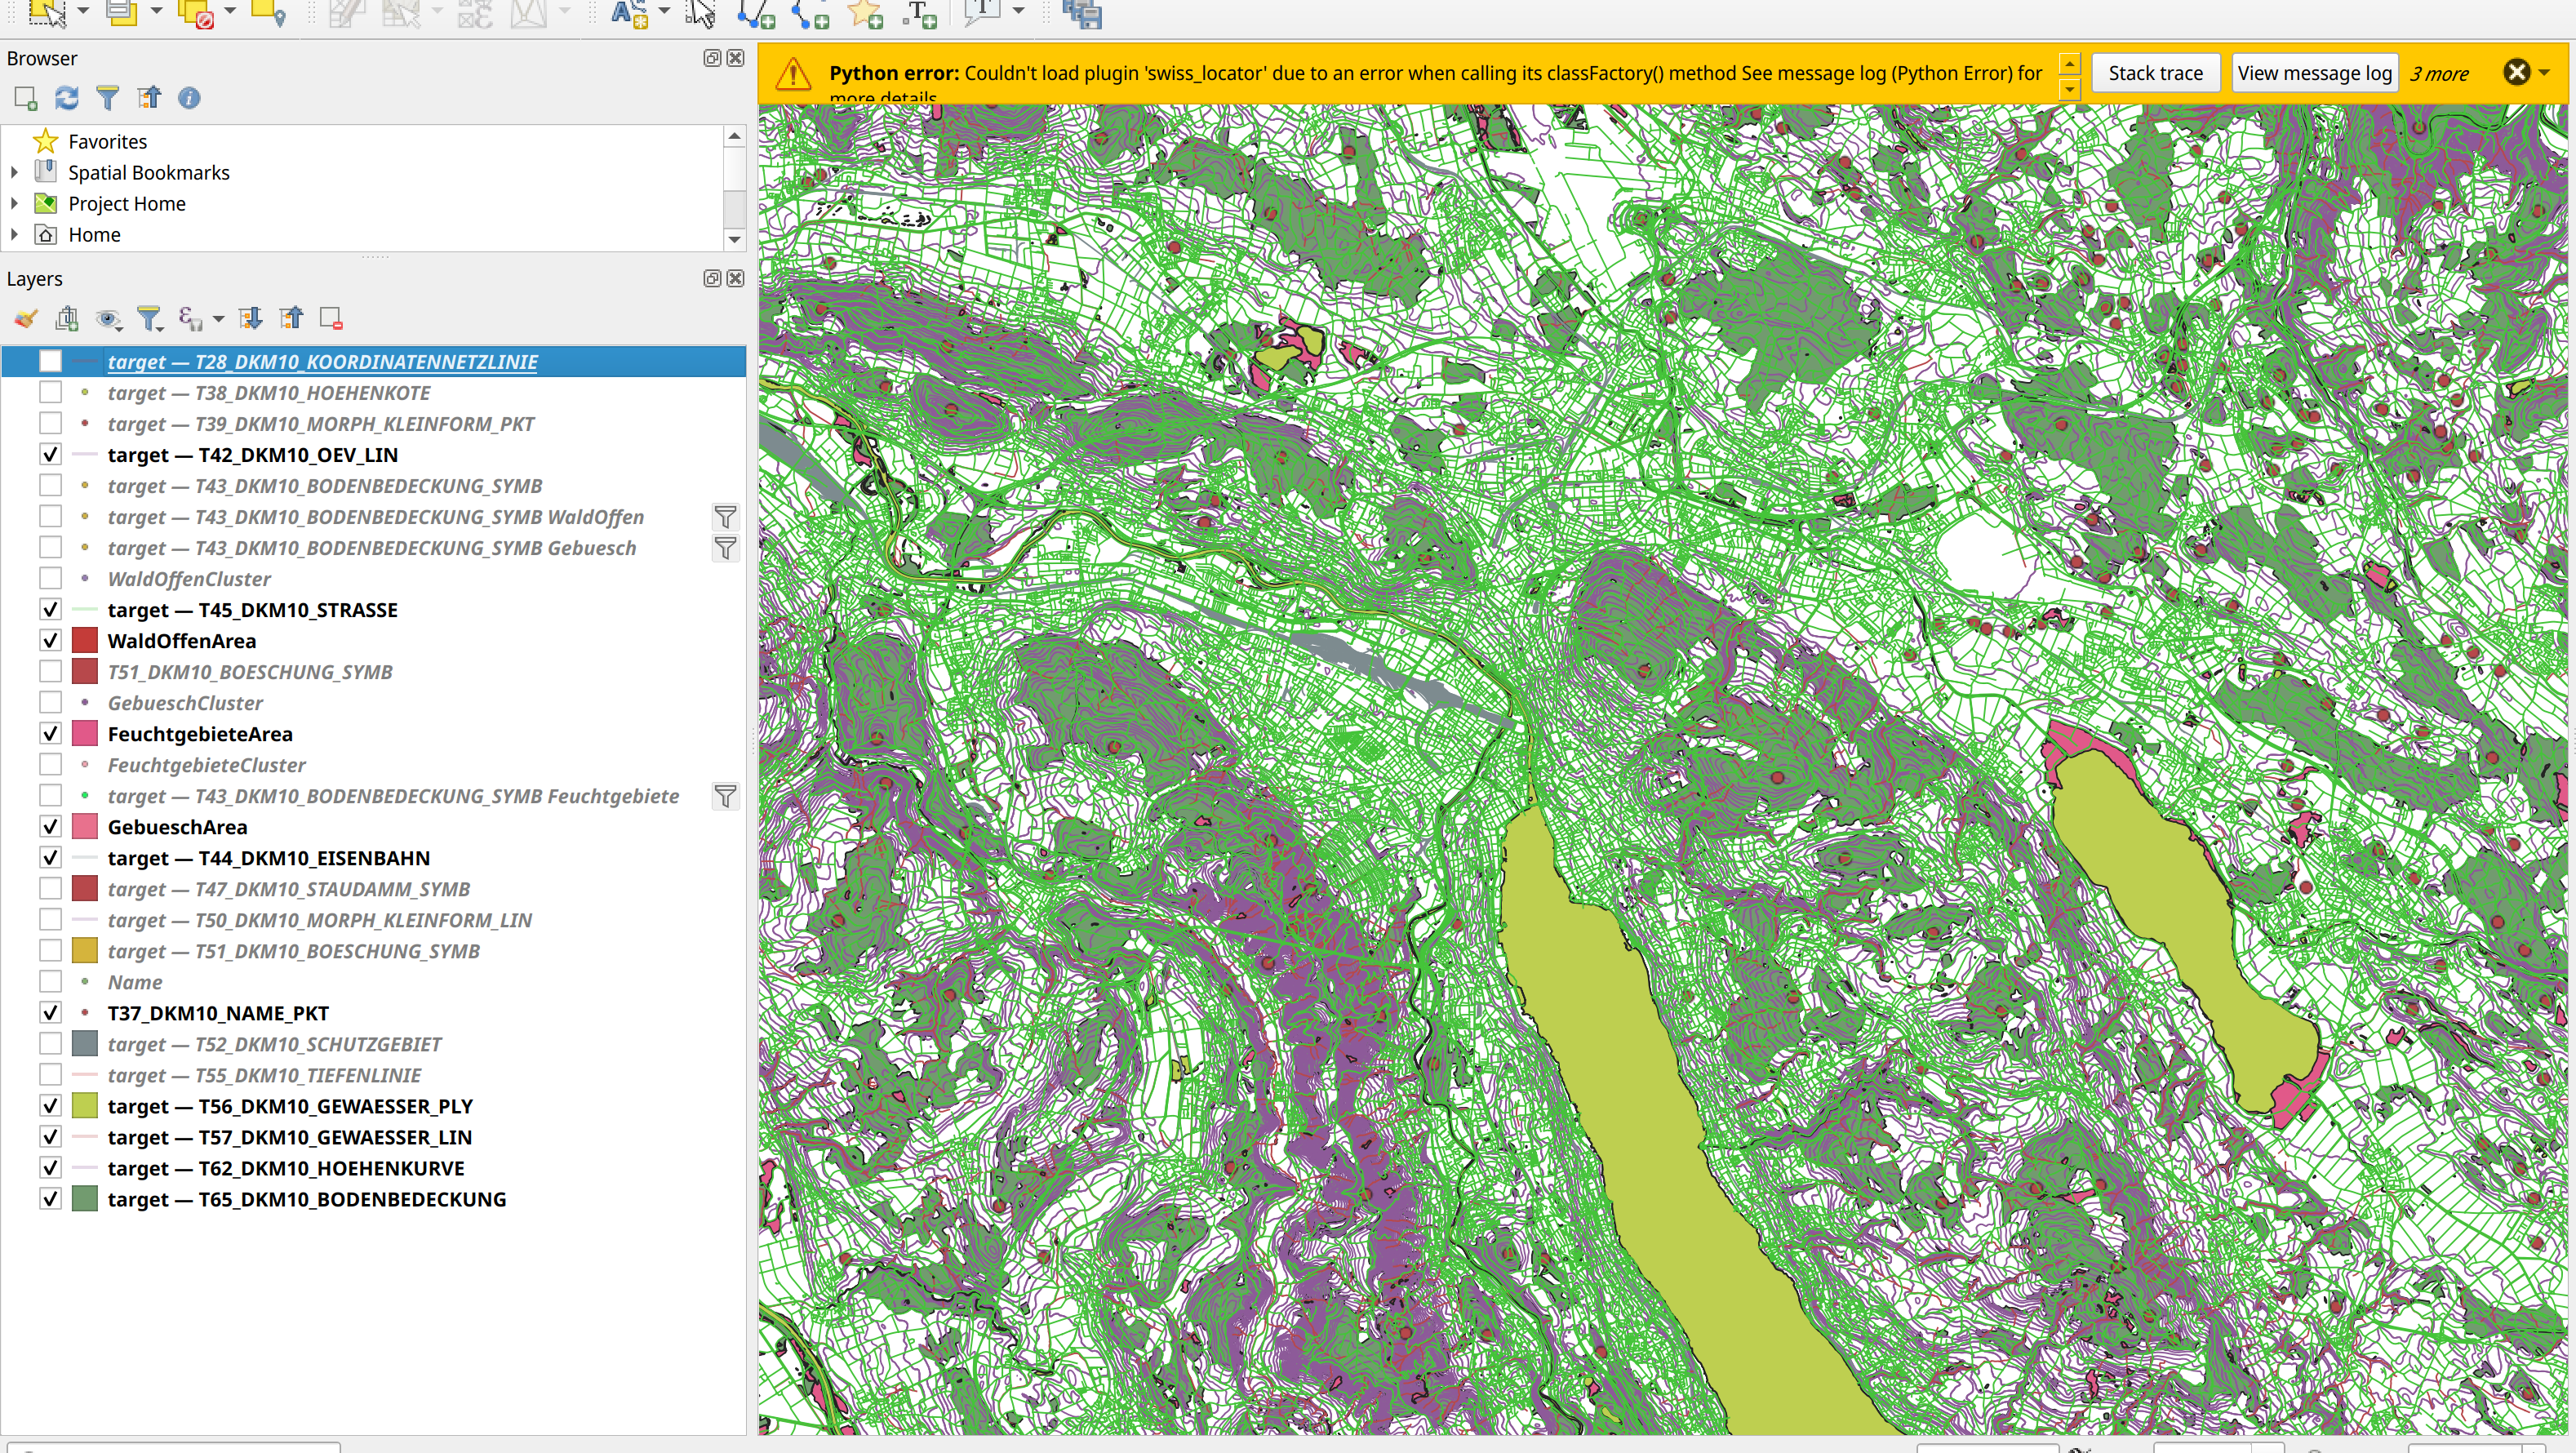
You can see the layers I selected, some of them in the SwissTopo data aren’t relevant for our purposes. Unfortunately, buildings and
railways aren’t rendered on the Vertix, so I didn’t include them in the final map (Sure would be nice to see mountain huts. Something
to work on for the future).
One peculiarity of the SwissTopo map is that some features are represented as points instead of areas. These include sparse forest, swamp
and shrubland. I used the DBSCAN clustering to group those points together and then the n-nearest neighbors concave hull command to turn
them into proper areas so they are usable in the map. Unfortunately this fails for shrubland (too many points?) but we can live without it.
Once this is done, we can export each layer to a file in the ESRI Shapefile format as a starting point for creating maps.
The most common open-source tool for creating Garming .img files is mkgmap and I decided to go with that.
Since it only accepts Open Street Map (.osm) files, we have to convert our ESRI Shapefiles to .osm somehow. This is not that easy,
as a lot of the scripts have limitations in regards to size of file they can process, the amount of memory they need and what data they
accept, mostly because they were intended for Open Street Map data. Many of the tools also expect unique ids for individual map elements/points,
so we’re just going to number them starting at -1 (negative numbers are arbitrary ids), later changing the sign to positive so other
tools can work with it.
The tools used are ogr2osm and Osmium.
# set initial id to -1
❯ echo "-1" > idfile

# convert each .shp to .osm individually
❯ for file (esri_shapefiles/*.shp) ogr2osm -o "osm_out/$(basename $file).osm" "$file" --add-version --idfile idfile --saveid idfile

# replace negative ids with positive ones
❯ sed -i 's/id="-/id="/g' osm_out/*.osm
❯ sed -i 's/ref="-/ref="/g' osm_out/*.osm
# merge all .osm files to a single one
❯ osmium merge -v osm_out/*.osm -o out.osm
We now have an .osm file that can be converted to a Garmin .img using mkgmap. The Open Street Map wiki
has a lot of details on this process and is an invaluable resource for creating Garmin maps. This project certainly wouldn’t
have been possible without it.
The gist of it is that you give mkgmap an .osm file and a style file that tells it how to convert data to garmin format.
For instance, OBJEKTART=Wald | OBJEKTART=Wald_offen_Symb [0x50 level 2] in the style file lets mkgmap know that any element in
the .osm that has OBJEKTART=Wald (Forest) or OBJEKTART=Wald_offen_Symb (Sparse Forest) should be rendered as Garmin type code 0x50
and that it should only show up at zoom level 2 or below.
It took me a while to figure out all the type codes that the Coros Vertix successfully renders, but through trial & error
I managed to create a style file that renders nicely.
All that was left was cutting the map into appropriate 1°x1° segments (or 1°x0.5° with L/R suffix where the resulting file size was too
big for Garmin .img) using a small python script I wrote and Osmosis,
and to then convert each segment using mkgmap, with another small python script.
I repeated the same process for the Topo/contour lines maps. This was a bit trickier due to reaching data/memory limits in Shapefiles and ogr2osm,
as well as the contours being too detailed for Garmin .img file sizes. In the end I settled for including only multiples of 20m height (same as
the original Coros maps), and simplifying the lines a little bit with a deviation of 5m, better than the ~30-50m of the original material.
Copying all this to the watch and, it works!
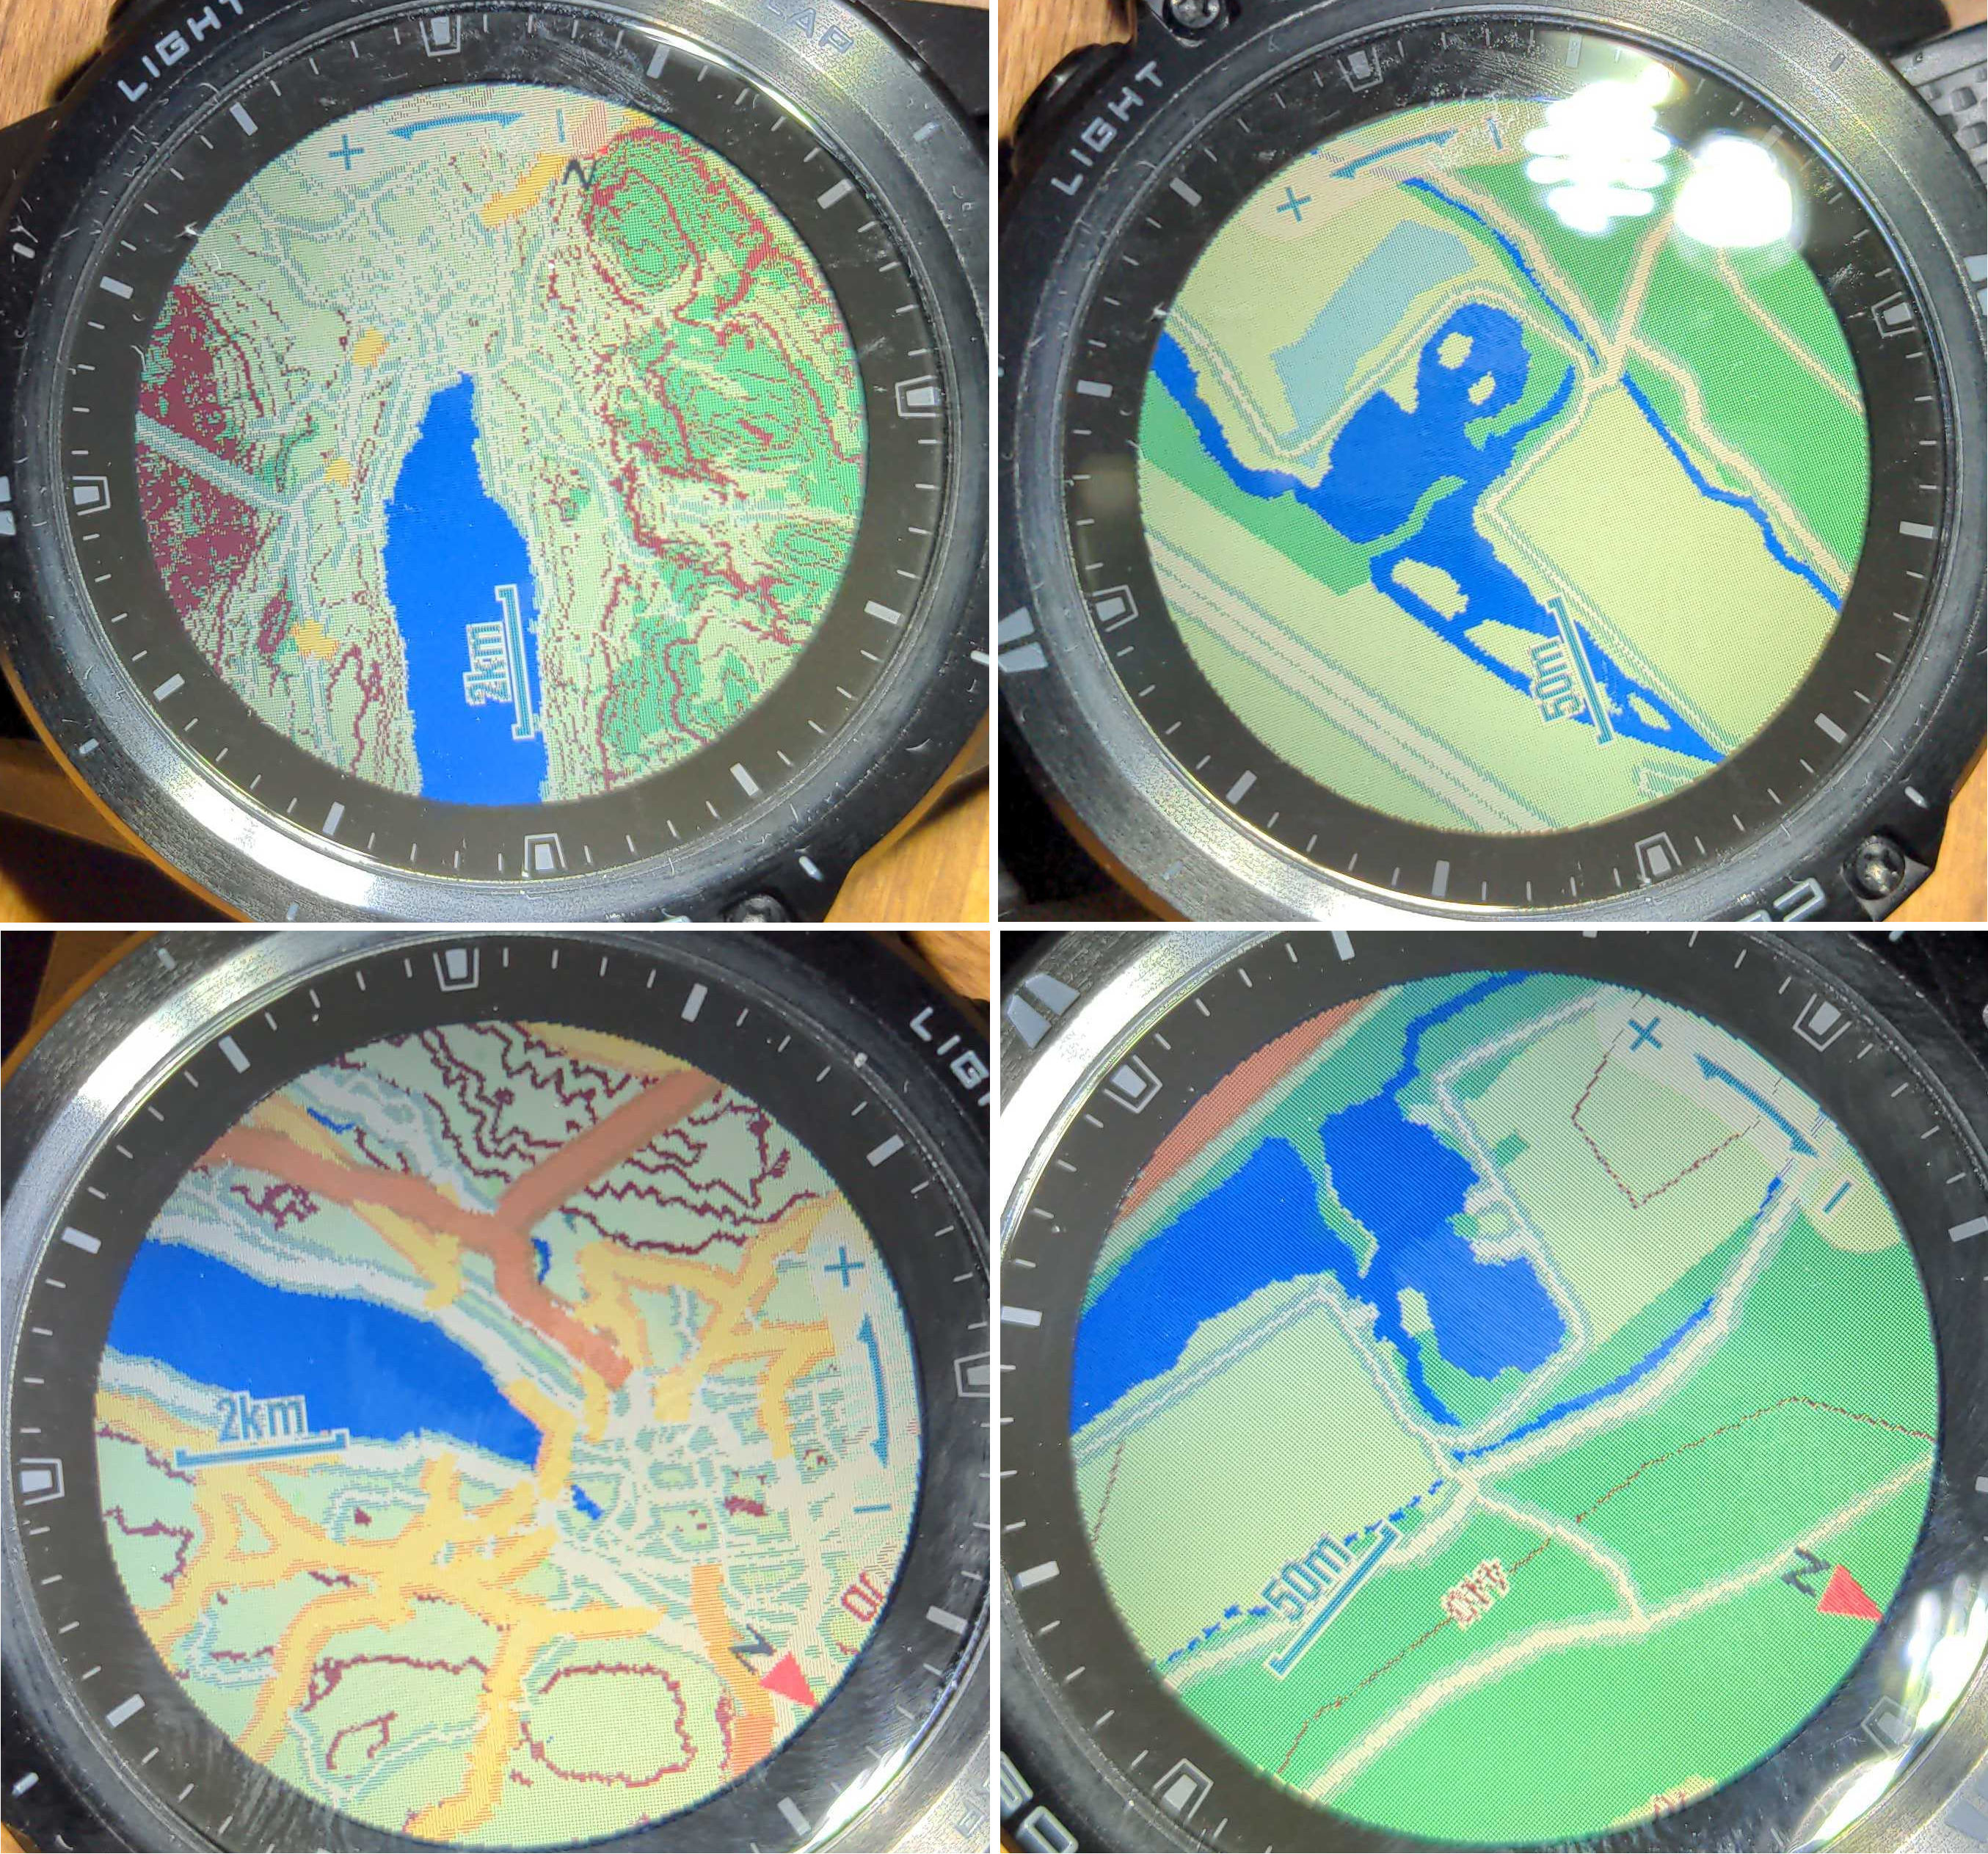
My map is in the top row and the official one at the bottom. You can see the small islands in the lake in the top right picture
(my version), along with the light-blue shaded area denoting wetland, both of which aren’t in the Coros maps. The rivers also show real contours as
opposed to being mostly just lines in the Coros maps. My map does not show highways as bold/in color as the Coros one, since those are rarely
useful in the mountains and I don’t intend to use my watch for car navigation. I also decided to show more height contours when zoomed out,
as this is useful to get an overview of the surrounding area. Also note that in the bottom left picture, the Coros map does not show
the forest in the hills next to Lake Zurich, even though forests can be very helpful in navigation and those are some major forests.
My Landscape maps are roughly 20% bigger in file size than the corresponding Coros maps and my Topo/contour maps are roughly 50% bigger in
file size. Despite this, my maps seem to load smoother on the device when zooming in/out or dragging the map around. I think this is due
to my maps using a larger block size in the Garmin .img files, which internally use a FAT32 filesystem.
The Maps
You can download the maps here. The maps are provided as is, without warranty of any kind,
express or implied. Use at your own risk. I do not guarantee the correctness of the maps, always bring a physical map and stay safe!
I did soft-lock my watch twice while playing around with creating maps and had to factory reset it to get it working again. You have been warned!
That said, they do work well for me and I haven’t had any issues with this version.
To install, simply remove the existing map files, if any, from your watch and copy the ones provided over USB into the Map directory.